Stage 15 : Resource Manager Module (4 Hours)
Learning Objectives
- Familiarise with passing of parameters to modules.
- Implement Resource Manager and Device Manager modules for terminal output handling.
Processes in eXpOS require various resources like terminal, disk, inode etc. To manage these resources among different processes eXpOS implements a resource manager module (Module 0).
Before the use of a resource, a process has to first acquire the required resource by invoking the resource manager. A process can acquire a resource if the resource is not already acquired by some other process. If the resource requested by a process is not available, then that process has to be blocked until the resource becomes free.
In the meanwhile, other processes may be scheduled.
A blocked process must wake up when the requested resource is released by the process which had acquired the resource. For this, when a process releases a resource, the state of other processes waiting for the resource must be set to READY
The resource manager module handles acquisition and release of system resources. A process must invoke the resource manager to acquire or release any system resource. The resource manager implements two functions for each resource - one to acquire the resource and the other to release the resource by a process. Details about different functions implemented in resource manager module are given here.
In this stage, you will learn how the terminal is shared by the processes for writing. The OS maintains a data structure called the Terminal Status Table. The Terminal Status table contains details ofthe process that has acquired the terminal. (Since there is only one terminal in the system, only one process is allowed to acquire the terminal at a time.) A flag named STATUS in the terminal status table indicates whether the terminal is available or not. When a process acquires the terminal, the PID of the process is updated in the terminal status table.
There are two functions related to terminal management in module 0. These are the Acquire Terminal and the Release Terminal functions. Each function has a function number to identify the function within the module. In the Resource Manager module, Acquire Terminal and Release Terminal have function numbers 8 and 9 respectively. When a module function is invoked, the function number (identifying the particular function within the module) is stored in register R1 and passed as argument to the module. The other arguments are passed through registers R2, R3 etc. See SPL module calling convention. For both Acquire Terminal and Release Terminal, PID of the currently running process needs to be passed as an argument through the register R2.
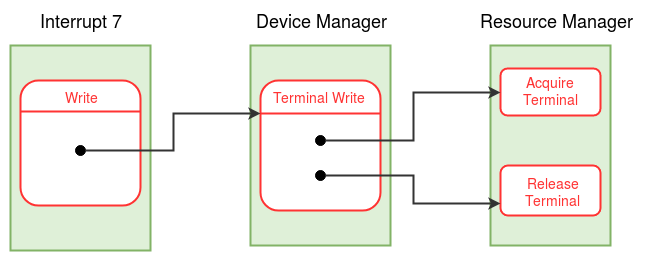
Acquire Terminal and Release Terminal are not directly invoked from the write system call. Write system call invokes a function called Terminal Write present in device manager module (Module 4). Terminal Write function acts as anabstract layer between the write system call and terminal handling functions in resource manager module. The function number for Terminal Write is 3 which is stored in register R1. The other arguments are PID of the current process and the word to be printed which are passed through registers R2 and R3 respectively. Terminal Write first acquires the terminal by calling Acquire Terminal. It prints the word (present in R3) passed as an argument. It then frees the terminal by invoking Release Terminal.
Since the invoked module will be modifying the contents of the machine registers during its execution, The invoker must save the registers in use into the (kernel) stack of the process before invoking the module. The module sets its return value in register R0 before returning to the caller. The invoker must extract the return value, pop back the saved registers and resume execution. SPL provides the facility to push and pop multiple registers in one statement using multipush and mutlipop respectively. Refer to the usage of multipush and multipop statements in SPL before proceeding further.
There is one important conceptual point to be explained here relating to resource acquisition. The Acquire Terminal function described above waits in a loop, in which it repeatedly invokes the scheduler if the terminal is not free. This kind of a waiting loop is called a busy loop or busy wait.
Why can't the process wait just once for a resource and simply proceed to acquire the resource when it is scheduled? In other words, what is the need for a wait in a loop? Pause to think before you read the explanation below. You will encounter such busy loops several times in this project, inside various module functions described in later stages.
When a process invokes the scheduler waiting for a resource, the scheduler runs the process again only after the resource becomes free. However, the process may find that the resource is locked again when it tries to acquire the resource when it resumes execution. This happens because when a resource is released, all processes waiting for the resource are woken up by the OS. Only the one that get scheduled first will be able to lock the resource successfully. Other processes will have to wait for the resource repeatedly before finally acquiring the resource.
A better solution to the problem that avoids a busy loop is to have the resource manager maintain a request queue associated with each resource. When a process requests a resource, it registers itself into a resource queue and goes into wait state. When the resource is released, the release resource function can wake up only the process which is at head of the queue. This avoids unnecessary scheduling of all the waiting processes. Real systems implement resource queues for system resources that also maintains the priorities of various requesting processes. In eXpOS, we avoid using resource queues to make the implementation easier.
Note
We haven't saved any registers into the stack while invoking the boot module from the OS startup code or the scheduler module from the timer interrupt routine as there was no register context to be saved. However, to invoke scheduler module from other modules or interrupt routines, it is necessary to save the register context into the stack for proper resumption of execution.
Modifying INT 7 routine
Interrupt routine 7 implemented in stage 10 is modified as given below to invoke Terminal Write function present in Device Manager module. Instead of print statement, write code to invoke Terminal Write function. Rest of the code remains intact.
1) Push all registers used till now in this interrupt routine using multipush statement in SPL.
multipush(R0, R1, R2, R3,...); // number of registers will depend on your code
2) Store the function number of Terminal Write in register R1, PID of the current process in register R2 and word to be printed to the terminal in register R3.
3) Call module 4 using call statement.
4) Ignore the value present in R0 as Terminal Write does not have any return value.
5) Use multipop statement to restore the registers pushed. Specify the same order of registers used in multipush as registers are popped in the reverse order in which they are specified in the multipop statement.
multipop(R0, R1, R2, R3,...);
Implementation of Module 4 (Device Manager Module)
In this stage, we will implement only Terminal Write function in this module.
1) Function number and current PID are stored in registers R1 and R2. Give meaningful names to these arguments.
alias functionNum R1;
alias currentPID R2;
2) Terminal write function has a function number 3. If the functionNum is 3, implement the following steps else return using return statement.
Calling Acquire Terminal :-
3) Push all the registers used till now in this module using the multipush statement in SPL as done earlier.
4) Store the function number 8 in register R1 and PID of the current process from the System Status table in register R2 (Can use currentPID, as it already contain current PID value).
5) Call module 0.
6) Ignore the value present in R0 as Acquire Terminal does not have any return value.
7) Use the multipop statement to restore the registers as done earlier.
8) Print the word in register R3, using the print statement.
Calling Release Terminal :-
9) Push all the registers used till now using the multipush statement as done earlier.
10) Store the function number 9 in register R1 and PID of the current process from the System Status table in register R2 (Can use currentPID, as it already contain current PID value).
11) Call module 0.
12) Return value will be stored in R0 by module 0. Save this return value in any other register if needed.
13) Restore the registers using the multipop statement.
14) Return using the return statement.
Implementation of Module 0 code for terminal handling
1) Function number is present in R1 and PID passed as an argument is stored in R2. Give meaningful names to these registers to use them further.
alias functionNum R1;
alias currentPID R2;
2) In Module 0, for the Acquire Terminal function (functionNum = 8) implement the following steps.
- The current process should wait in a loop until the terminal is free. Repeat the following steps if STATUS field in the Terminal Status table is 1(terminal is allocated to other process).
- Change the state of the current process in its process table entry to WAIT_TERMINAL.
- Push the registers used till now using the multipush statement.
- Call the scheduler to schedule other process as this process is waiting for terminal.
- Pop the registers pushed before. (Note that this code will be executed only after the scheduler schedules the process again, which in turn occurs only after the terminal was released by the holding process by invoking the release terminal function.)
- Change the STATUS field to 1 and PID field to currentPID in the Terminal Status Table.
- Return using the return statement.
3) For the Release Terminal function (functionNum = 9) implement the following steps.
- currentPID and PID stored in the Terminal Status table should be same. If these are not same, then process is trying to release the terminal without acquiring it. If this case occurs, store -1 as the return value in register R0 and return from the module.
- Change the STATUS field in the Terminal Status table to 0, indicating terminal is released.
- Update the STATE to READY for all processes (with valid PID) which have STATE as WAIT_TERMINAL.
- Save 0 in register R0 indicating success.
- Return to the caller.
Modifying Boot Module code
- Load Module 0 from disk pages 53 and 54 to memory pages 40 and 41.
- Load Module 4 from disk pages 61 and 62 to memory pages 48 and 49.
- Initialize the STATUS field in the Terminal Status tableas 0. This will indicate that the terminal is free before scheduling the first process.
Making things work
- Compile and load boot module code, module 0, module 4, modified INT 7 routine using XFS-interface.
- Run the machine with two programs one printing even numbers and another printing odd numbers from 1 to 100 along with the idle process.
According to eXpOS resource management system introduced here, will Deadlock occur? If yes, explain it with a situation. If no, which of the four conditions of Deadlock are not satisfied?
Deadlock will not occur according to the resource management system implemented here. As hold and wait, circular wait conditions are not satisfied (there is only one resource - the terminal - now).
Info
See link for a set of neccessary conditions for deadlock.
Assignment 1
Set a breakpoint (see SPL breakpoint instruction) just before return from the Acquire Terminal and the Release Terminal functions in the Resource Manager module to dump the Terminal Status Table (see XSM debuggerfor various printing options).